I love good mail days—when there’s a package from my mom, or a magazine. So I was super-excited to get my contributor copy of Stampington’s Jewelry Affaire magazine…oh, my. It is gorgeous, and made me want to drop all the work stuff I was doing and curl up for a good read.
The whole issue has this kind of vintage/French effect that I can’t describe…pieces that are really unique, but tasteful and classic at the same time. Once I did get a chance to sit down with the magazine, I wanted to run out to my studio and start making stuff.
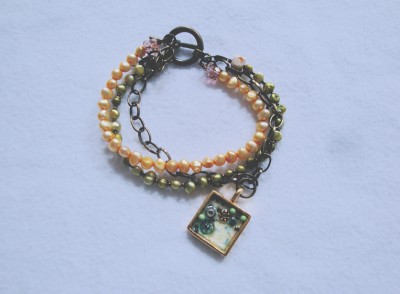
I was really happy to have my Bohemian Bracelet included in the issue. Since the magazine could only incorporate a short description of how it was made, I’m including more info and step-by-step instructions here.
Personalizing Your Patera Pendant
Cut or punch a piece of paper to fit inside the pendant. Any lightweight paper works well for this technique; I haven’t had much luck with cardstock and heavier papers, though.
Apply glue stick evenly on the back of your paper piece—it’s important to get adhesive on all the edges and corners of the paper. Place it inside the pendant and use the tip of your bone folder to firmly flatten all the edges of the paper. Let the paper dry thoroughly. You’ll want it glued securely inside the pendant—if any edges or corners can lift up, the Diamond Glaze will seep underneath and result in an uneven effect.
Setting with Diamond Glaze
Before adding the Diamond Glaze, make sure you have a pin and a moist baby wipe on hand. Place the pendant on a level surface and slowly squeeze the Diamond Glaze into the Patera, guiding the tip of the applicator into all the corners of the pendant. Work slowly—shaking the bottle or repeated lifting will result in air bubbles. If you get an air bubble, poke it with the pin. If it doesn’t burst, wipe the pin with the baby wipe and repeat.
Once you’ve filled the pendant, place it on a level surface with the loop of the pendant off the edge of the surface. (If you put the Patera on a table, the loop will make it slightly uneven and the glaze won’t set properly.) The glaze needs a couple of hours to dry, and I check periodically to make sure air bubbles haven’t appeared.
Oops—Now What?
Every now and then, something goes awry. This could be a can’t-ignore-it air bubble or buckled paper in the set glaze. You can get a second chance to use the pendant. Here’s how:
After the glaze has set, run a craft knife blade along the inside edges of the pendant. Place the pendant in a cup and squirt in a dollop of liquid dishwashing soap. Pour in boiling water and let it sit overnight. The next morning, the glaze will be loosened enough to prise it out, or it will be floating in the water. Just rinse out the pendant and you’re good to go. Whew!
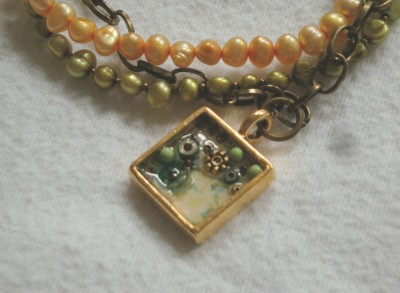
Bohemian Bracelet: Finished piece is 8” long
Supplies:
• Patera pendant (Nunn Design)
• Scrap of lightweight scrapbook paper
• Diamond Glaze (Judikins)
• 29 olive green 4mm flat potato pearls
• 31 pink peach 4mm potato pearls
• 38 size 13 copper metallic Czech charlotte seed beads (28 for the bracelet, 10 for the pendant)
• 2 cream/brown 3mm square beads
• 4 medium purple crystal discs
• Toggle clasp, crimp beads, flexible beading wire (Soft Flex, .014)
• 7 ½” brass chain
• 7 brass jump rings, one 7mm and six 4mm
• Glue stick (Pritt)
• Bone folder
• for the pendant: watch parts, seed beads, daisy spacer
• tweezers
1) Cut a piece of scrapbook paper to fit inside the pendant and glue. Squeeze a bit of Diamond Glaze into the pendant. Sprinkle the watch parts, seed beads, charlottes and a daisy spacer inside the pendant, using the tweezers to adjust the placement. Add more Diamond Glaze and let set.
2) For the olive strand: Thread a square bead, a crimp bead and a jump ring onto a piece of beading wire. Pass the wire back through the beads, and gently pull the wire to tighten. Crimp. String alternating olive pearls and charlottes, ending with a square bead, crimp and jump ring.
3) For the peach strand: Thread two disc beads, a crimp and a jump ring onto a piece of beading wire. Pass the wire back through the beads and gently pull the wire to tighten. Crimp. Thread the pink peach pearls, ending with two discs, a crimp and a jump ring.
4) Add a jump ring to each end of the clasp. Attach both pearl strands to the jump rings. Attach the chain to the jump rings. (I let about 1” of excess chain hang loose.) Use a jump ring to attach the pendant to the chain.

