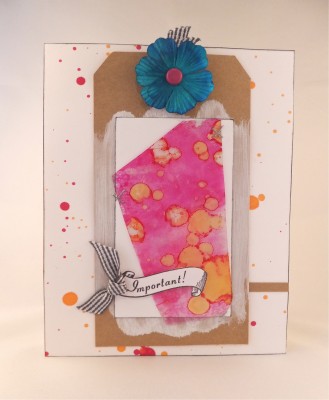
Today on Studio SN: Alcohol Ink and Mica!

This was one of those “I wonder if?” projects for me. While cleaning out my studio, I discovered a rather large (neglected) pile of mica tiles and thought: It’s been so long since I used mica—probably six or seven years, actually. So with my latest addiction to Spectrum Noir alcohol inks, I thought this would be a fun experiment. It’s a very different look for me, I think but I really like it!
Here’s what you need:
– Spectrum Noir alcohol ink refills: DR5, OR1 (Crafter’s Companion)
– Neenah Classic Crest Card (Crafter’s Companion) or Silky Papers (Hot Off The Press)
– Mica Tiles (USArtQuest)
– Artful Collection stamps (Hot Off The Press)
– Rubbing alcohol in spray bottle
– Tim Holtz Tiny Attacher mini stapler
– Foam tape
– Black inkpad
– White paper flower, Calypso Teal Dylusions, pink brad
– White cardstock
– White acrylic paint
– Kraft tag, black and white ribbon
– Small piece of kitchen sponge
– White blank card
Here’s how to do it:
1. Splice off a layer of mica—use your fingernail to get between the mica layers. The thinner the layer, the lighter the color will be.
2. Place on your work surface and squeeze on a few drops of DR5 onto the mica. Tap with the kitchen sponge to spread it over the mica piece. Hold the OR1 dropper and tap with your hand to get more color on the mica piece. Use a clean section of the sponge to spread out the color.
3. Spritz lightly with rubbing alcohol. Let dry.
4. Cut a 5.5″ x 7″ piece of Neenah cardstock. Hold the DR5 dropper and tap with your hand to get a fine spatter of color. Repeat with OR1. Glue to the front of your card and trim the edges. Ink with black.
5. Cut off the bottom 1/4″ of the kraft tag. Glue the leftover 1/4″ piece even with the right side of the card front. Paint the center of the tag with white. Insert a small loop of check ribbon through the hole in the tag. Spray a white paper flower with Dylusions, let dry and insert at the top of the tag with a pink brad.
6. Ink the edges of a 4 1/4″ x 2 1/4″ piece of white cardstock and glue to the center of the card. Attach the mica piece with mini staples. (It helps to first glue the center of the mica with a bit of stick glue.)
7. Stamp “Important” on white cardstock and cut out, then attach with foam tape. Tie a knot in check ribbon and glue as shown.
And that’s it! Looking at the supply list, it seems like this would be a pretty complicated process, but you can of course scale things down and use what you have in your stash—which is what I did. And how fun to experiment with different colors of alcohol inks, too! I found that brighter colors worked best, and to attach the mica onto something white or off-white made the color pop more. See what you discover when you start playing!
And to see the step-by-step video for this, just come on over to Studio SN on You Tube to see the Alcohol Ink and Mica episode! PS. While you’re there, you can subscribe to the channel as well—then you’ll get automatically updated every time I post a new episode!
Happy Wednesday!


