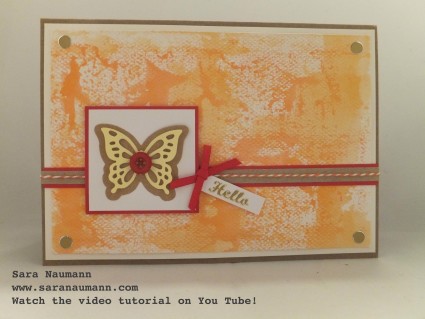
Today on Studio SN: Cardmaking Backgrounds with Spectrum Aqua Markers!

It only takes minutes to get a pretty watercolor effect…with markers! These cool Spectrum Aqua Marker pens are filled with dye-based ink that’s water-soluble, so the color can be easily diffused and blended with water for a variety of tones. Each marker is dual-tipped, with a fine point for details and a brush nib for larger surfaces.
Cardmaking Backgrounds with Spectrum Aqua Markers, what you need:
• Spectrum Aqua Markers, Primary set (Crafter’s Companion)
• Gold Jewel Dazzles™ (Hot Off The Press/Paper Wishes)
• Gold Tiny Words & Phrases Dazzles™ (Hot Off The Press/Paper Wishes)
• 10 Tiny Things & Shadows Cutting Dies (Hot Off The Press/Paper Wishes)
• Brayer
• Clear acrylic block
• Water mister
• Watercolor cardstock (Crafter’s Companion)
• Kraft, smooth white, red, yellow cardstock
• Baker’s twine, red ribbon, red button
• Kraft card blank
• Foam tape
Cardmaking Backgrounds with Spectrum Aqua Markers, how to do it:
1. Scribble Orange marker onto the acrylic block. Scribble another area of the block with Sunset. Spritz with water, then brayer the orange across the cardstock. Repeat with Sunset. Let dry.
2. Trim the piece to size, then mat on white cardstock. Add a horizontal strip of kraft cardstock mounted on red. Glue the piece to the front of a kraft card.
3. Wrap the piece with baker’s twine, taping the ends to the front of the card where the focal will hid them. Die cut the butterfly from yellow and the shadow from kraft. Add a button in the center. Glue to white cardstock, then mat on red. Use foam tape to adhere to the card front.
4. Place the “hello” sticker on white, trim and foam-tape as shown. Tie a bow in red ribbon and glue to the card front. Place gold circle stickers in each corner.
Simple, isn’t it? And a great way to create quick and easy backgrounds. Want to see the video tutorial? Then pop by You Tube to watch the Cardmaking Backgrounds with Spectrum Aqua Markers segment!


