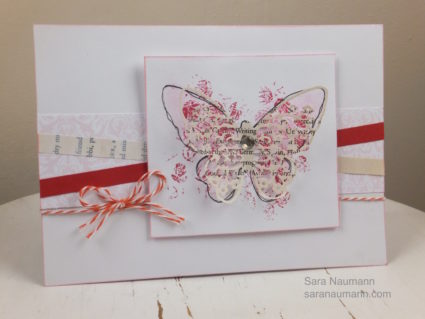
When I demoed this technique on Create and Craft TV, I told viewers: “I’m going to go a little out of the box here!” I love that with lots of the Couture dies, you can opt for a very clean look, a really traditional effect or even something a bit outside the box.

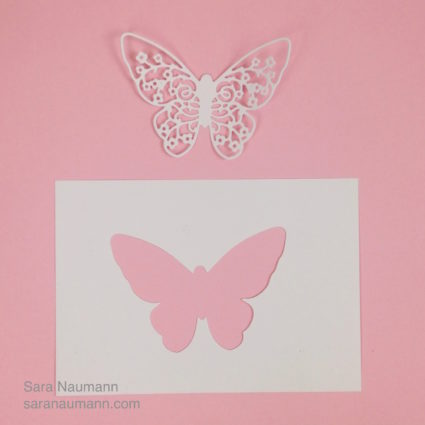
In this case, I’m using the butterfly die in two ways: First, to cut the intricate butterfly from book paper to be an accent. The second is to use the leftover (the “negative” of the image) as a stencil.

Couture Garden of Eden Stippled Butterfly, what you need—
Couture Garden of Eden dies from Create and Craft (comes with CD with printable patterned paper) Available at the Create and Craft website for the UK and the US.
Altenew inks: Coral Berry, Ruby Red, Cotton Candy
Cardstock: White, red
Book paper
Black fine-tip pen
Stipple brush
Red baker’s twine
Foam tape
Blank card
Self adhesive rhinestone
Bubble wrap
Couture Garden of Eden Stippled Butterfly, how to make it—
1. Die cut the butterfly twice: Once from book paper, and again from white cardstock. Set the book paper butterfly aside to use for this project; set the white cardstock butterfly aside to use for a future project.
2. Place the negative of the white cardstock butterfly onto another piece of white cardstock. Hold it in place as a stencil while you trace the outside edges with black pen. Remove the stencil and re-trace the butterfly shape. Don’t worry if it’s not totally perfect—you want a sketchy look!
3. Replace the stencil on top of the butterfly and stipple with Coral Berry. Remove the stencil. Ink the bubble side of a piece of bubble wrap with Ruby Red and stamp to create an abstract effect on the butterfly. Tip: I use a small piece of bubble wrap—maybe 3” or so—and stamp it twice. That gives me a bit more control.
4. Trim the stenciled butterfly piece to 3 1/2” x 4” and ink the edges with Cotton Candy. Adhere the book paper butterfly on top of the stenciled image, gluing only the center of the body and allowing the wings to lift. Add a rhinestone to the center of the butterfly body.
5. Cut a 2”-wide strip of pink patterned paper from the CD and glue across the card front. Glue a 1/2”-wide strip of book paper and a strip of red cardstock diagonally across the card front. Wrap the front panel with baker’s twine, securing the ends to the card front. Use foam tape to add the stenciled butterfly to the card front. Tie a bow in baker’s twine and glue as shown.
This is a project I originally demonstrated on Create and Craft TV. If you’d like to see more great demos and fun products, be sure to tune in or watch online!


