Today on Studio SN: Distress Ink and Embossing Plates!

This has to be one of the most fun techniques I’ve played with in a long time. There are tons of twists you can take on it too, depending on your ink colors, embossing plates and the amount of water you use on them.
Here’s what you need:
– Distress Ink from Ranger: I used Salty Ocean and Mowed Lawn Distress Ink Minis
– Dandelion Embossing Folder (Hot Off The Press)
– Eclectica ESN01 Stamps (Paper Artsy)
– Water mister
– Craft sheet
– Cosmetic wedge
– Off-white cardstock (mine was slightly textured—yours can be smooth if you want)
– Light teal, dark teal cardstock
– Foam tape
– Blue grosgrain ribbon
– Embossing machine (Cuttlebug, Grand Calibur or other)
– Blank white card (mine is 5″x6 1/2″)
Here’s how to do it:
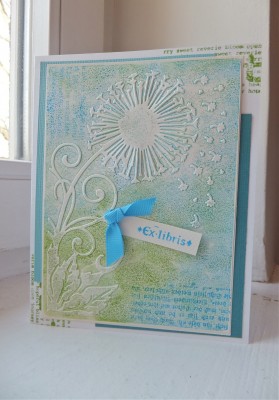
1. Lightly mist the debossed side of your embossing plate with water. Apply Salty Ocean ink on most of the plate. Press the Mowed Lawn ink onto your craft sheet and use a cosmetic wedge to pick up the color and apply it to the rest of the embossing plate. Pounce the cosmetic wedge all over the debossed side, to blend the green ink into the blue.
2. Place the paper into the embossing folder and run through your embossing machine.
3. Remove the paper.
4. Use Salty Ocean to stamp the German script at the bottom right and the top left of the embossed piece. Mat on off-white cardstock.
5. Use Mowed Lawn to stamp the Art script at the top right of your card front and along the bottom left. Glue a 5 1/4″x4″ piece of light teal cardstock to the card front, slightly inset from the fold of the card. Glue a 3 1/4″ x 4 3/4″ piece of dark teal cardstock to the card front, slightly inset from the right side of the card.
6. Glue the embossed piece to the card front. Stamp the Ex-Libris stamp with Salty Ocean on off-white cardstock and trim, then foam-tape to the card front. Tie a knot in blue ribbon and glue as shown.
So easy! And again, you can alter the ink colors and amount of water you use to get some really different looks. Plus, since the embossed piece will cover most of your card front, you can keep the rest of the design really simple. I just used scraps of cardstock behind the embossed piece.
Want to see the video for this? Then pop on by Studio SN on You Tube to watch the Distress Ink and Embossing Plates segment!
Happy Wednesday!


