Today on Studio SN on You Tube: Double Heat Embossing with WOW Embossing Powders!

Heat embossing is one of those classic techniques. Many stampers will say that seeing it demonstrated for the first time was a magical moment—same here, I couldn’t believe the effect you could achieve!
Fast forward a few years and I realized that I hardly did any embossing. Why? Because I didn’t have a place for it. If I wanted to emboss an image, I had to clear space, pull out the heat gun and powders and it was just a giant hassle. I had no space! But I love the look and texture, so I decided to make the process easier and more efficient. I cleared off the top of a small storage rack close to the outlet (I have limited outlets in my room) and covered it with a craft sheet that’s dedicated to embossing. My heat gun hangs on a hook on the storage rack. All I have to do is carry my paper over to heat set. It’s amazing how much tidier and easier it is now!
The coolest thing, though? Now that it’s so convenient to do my heat embossing, I feel much more free in terms of experimenting. And even better: I come up with interesting ideas that actually become pretty cool things to share with you!
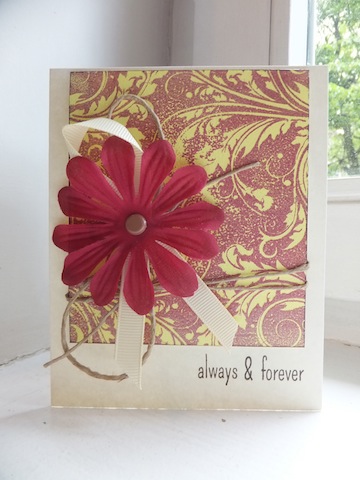
So here’s today’s segment: Using embossing powder as a background, with a second layer of powder stamped on top. Yep, a double layer of powder. How cool is that?
Here’s what you need:
– Primary Purple Orchid Regular, Fluorescent Yellow Regular embossing powders (WOW). Folks in the UK can find them on their UK site; if you’re in the US, pop by their American site to find a store near you.
– Craft sheet (mine is from Ranger)
– Heat tool (WOW)
– Black inkpad
– Foam tape
– Stamps: Brocade, Express Yourself (WOW). If you’re in the UK, find them here; if you’re in the US, pop by their American site to find a store near you.
– Glossy white cardstock
– Silk flower, brad, cream grosgrain ribbon, hemp twine
– Cream card blank
– Scrap paper, folded in half
Here’s how to do it:
1. Place glossy card on scrap paper and squash Versamark all over the surface to cover it completely. Open the folded scrap paper and place the inky piece inside. Sprinkle with Fluorescent Yellow, covering it completely. Tap off excess, then funnel the rest of the embossing powder back into the jar. Tip: Don’t do the ink-squashing and sprinkling on the same side of the scrap paper—inevitably you’ll get Versamark on the scrap paper, then the powder will stick there, too!
2. Place the cardstock on a craft sheet, then heat set the embossing powder. Remember it will take a few minutes to melt, since you’re covering a large surface. Let it cool before handling.
3. Ink the Brocade stamp with Versamark and stamp on the yellow embossed surface. Repeat the funnel and embossing step, using Purple Orchid.
4. Trim the stamped piece and ink the edges black. Wrap with twine and foam-tape to the card front. Add a flower, brad and loop of twine and grosgrain ribbon.
5. Stamp “always & forever” with black.
Easy, isn’t it? This has become a favorite technique for me—another great way to play with embossing powder!
If you’d like to see a video tutorial of the technique, just come on over to Studio SN on You Tube to watch the Double Heat Embossing segment this week!


