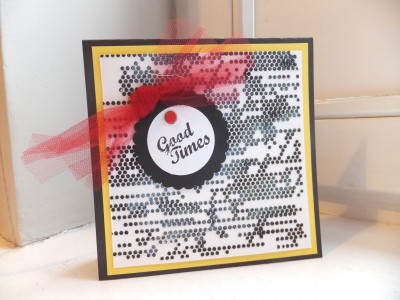
Today on Studio SN on You Tube: Embossing Paste and Stencils!

Lately I’ve really had a lot of fun with the Studio 490 Wendy Vecchi Embossing Paste. Maybe you’re like me and went through a metal-stencil-embossing-paste phase years ago; well, this embossing paste is black, and sometimes it’s a little twist like a new color to get you really excited about a classic technique.
I’m easy to please. 😉
Of course I couldn’t stop at just embossing paste—I wanted to add a touch of shine to the project too, so I sprinkled fine glitter into the embossing paste while it was wet. There you go, subtle shine and a little extra touch of fun. And you know me, it’s got to be easy!
Here’s what you’ll need:
• Black Embossing Paste: Studio 490 Wendy Vecchi Embossing Paste from Dreamweaver
• Stencil: Tiny Circles from The Crafter’s Workshop
• Super-fine clear glitter
• Stamp: HPXT03 from Paper Artsy
• Cardstock: White, black, yellow
• Red tulle ribbon
• Blank card: 5 3/4″ x 6″
• Masking tape or washi tape
• Black ink
• Brad
• Foam tape
• Palette knife
• Punches: 2 1/2″ circle scallop punch, 1 3/4″ circle punch
How to make it:
1. Tape your stencil onto your white cardstock. Use the palette knife to scrape on the embossing paste. Lift off the stencil and sprinkle fine glitter into the embossing paste while it’s still wet. Shake off excess glitter.
2. Let dry, then trim to 5 1/4″ square and mat on yellow cardstock. Glue to the card front.
3. Stamp “good times” in black on white cardstock, then layer on a black scallop-punched piece. Add a red brad. Use foam tape to adhere the piece to the card front. Tie a knot in a piece of red tulle ribbon and glue to the card front with tacky glue.
That’s it—not only do you have a super-fun technique, but a versatile one as well! Want to see a video demonstration? Then pop on over to You Tube. Keep watching too, because I’ll show more variations on the theme in the next few weeks on Studio SN on You Tube!


