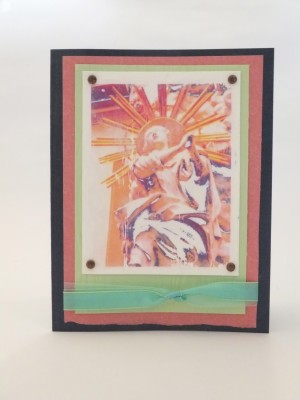
This week on Studio SN on You Tube: Gesso Photo Transfers!
I love this technique because it’s so easy to do—and it’s a great way to showcase your photos. I don’t know about you, but I take a lot of photos of scenery or things that aren’t people, and this technique is ideal for playing with those photos. The results are great for cards and art journal pages, but I also think you could also make a small framed piece of art as a gift. (I’m thinking Christmas!)

Here’s what you’ll need:
– Laser color copy of a photo (yes, I’ve tried with inkjet prints and the results are not good!). Print photos on your home printer and take them to the local copy shop. It sounds like extra work, but trust me…when you’re halfway through the process and realize there’s ink bleeding all over, it just becomes so worth it!
– Watercolor paper
– Gesso: Claudine Hellmuth Studio Gesso from Ranger
– Gel medium: Claudine Hellmuth Multi-Medium from Ranger
– Paintbrush
– Copper brads
– Cardstock: Green, mauve
– Navy blank card
– Green sheer ribbon
– Water spritzer
Here’s how to make it:
1) Use the paintbrush to apply gesso to a piece of watercolor paper. Think of the application in terms of putting peanut butter on bread—you need something for the photo to “hang” on to but you don’t want the gesso to squelch out when you press the photo down.
2) Press the photo face-down into the gesso. Burnish gently but firmly, making sure all corners and edges are in the gesso.
3) Let dry thoroughly.
4) Spritz heavily with water, allowing the water to soak in. Start rubbing the paper off gently with your finger.
5) When all the paper is removed, use your finger to rub on a bit of multi-medium. Let dry, then trim and mat on green cardstock and mauve cardstock. Add copper brads. Wrap with green ribbon and glue to the card front.
Want to see the video demonstration? Then stop on by Studio SN on You Tube! Hope to see you there!


