Welcome to Washi Tape Tuesday! Love washi tape? (Or maybe you have a stash that you want to put to use?) Then join me for tips, techniques and ideas for adding washi tape to your handmade cards!
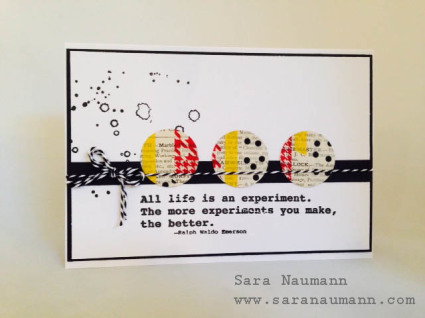
This card is such a quick and easy design—I love it for it’s simplicity, yet it still packs a punch, design-wise. You can also get a lot of variety from it, just depending on the tape colors you use and even the size of the punch.

Washi Tape: Punched Circles
You’ll need:
– Washi tape: red herringbone, yellow solid, white with black dots
– Circle punch: 1 1/4″
– Stamps: Eclectica ESN09 from PaperArtsy
– Sheet of book paper
– Black and white baker’s twine
– Black inkpad
– Cardstock: Black, white
How to make it:
1. Tear a page from an old book. I used a strip about 2″ wide. Apply strips of washi tape on top of the book paper, allowing some areas to remain uncovered.
2. Punch three circles from the washi tape book paper.
3. Cut a 6 3/4″ x 4 1/4″ piece of white cardstock. Stamp the open spatter design with black ink on the left side. Stamp the quote at the center bottom.
4. Glue a narrow strip of black cardstock horizontally across the white cardstock. Glue the three punched circles as shown. Wrap with baker’s twine. Tie a bow in baker’s twine and glue on the left.
5. Mat on black cardstock and glue to the card front.
That’s it—so easy, you could do this in about half an hour. Quick, easy and fun!
Enjoy…and happy Washi Tape Tuesday!
Love washi tape? Want tons of ideas, techniques and card projects? Twenty to Make Washi Tape Cards is packed with 20 washi tape projects, each with complete step-by-step instructions—PLUS 20 alternate card ideas…you get 40 creative washi tape card project ideas in all. Available from Search Press, this instruction book is the perfect thing for cardmakers who love washi tape! Click the video below to learn more!


